Best Mini Table Saws: How to Choose a Small Saw for Models and Crafts
The best mini table saws are purpose-built bench saws for small stock, model making, miniature woodworking, and craft projects. They are not simply smaller versions of jobsite table saws. Their tiny tables, small blades, shallow cut capacity, compact fences, and specialized accessories make them useful for narrow strips and small parts—but unsuitable for ripping ordinary framing lumber, breaking down full sheets, or replacing a full-size saw.
That distinction is important because listings use similar names for very different products. A miniature bench saw from a tool maker, a hobby-size tilting-arbor saw, and an inexpensive multi-function craft device may all appear under “mini table saw.” Compare the exact machine, manual, blade system, supported material, and maker’s safety guidance rather than trusting a broad label or a bundle of accessories. This guide focuses on the miniature model-building and small craft category, with practical buying and setup questions. It does not claim hands-on testing, and it avoids treating product marketing terms as verified performance.
Affiliate disclosure: DailyHomeDecorating.com may earn a commission from qualifying purchases through links in this article. This does not change the price you pay.
Amazon product examples to compare

ASIN: B0933BRJVL
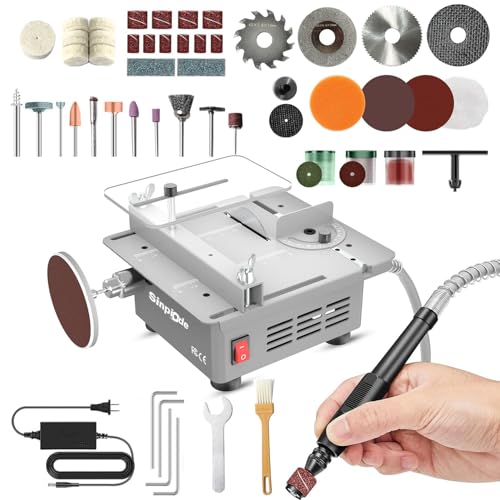
ASIN: B0H2M76Z1Q

ASIN: B0HHJLMBGZ

ASIN: B0FDGQBZ8C
Certain content that appears on this site comes from Amazon. This content is provided “as is” and is subject to change or removal at any time. Product examples and images are supplied through Amazon Creators API; confirm specifications and availability on the current listing.
Table of contents
- Quick guide: what mini saws are for
- Define the mini table saw category
- Match the saw to small-stock tasks
- Blade, arbor, fence, and capacity
- Precision and repeatability
- Small-saw setup and safety
- Dust, noise, and workspace
- Buying and ownership checklist
- When another tool is better
- Frequently asked questions
Quick guide: what mini table saws are for
| Project | Mini saw fit | What to verify |
|---|---|---|
| Model ships, buildings, dollhouse parts | Often a strong fit for small, repeatable strips and crosscuts | Fence precision, blade choice, minimum safe stock size |
| Thin plywood, balsa, small hardwood pieces | Possible when the exact model and blade are rated for the stock | Material thickness, width, blade height, feed support |
| Plastic sheet and model-making materials | Possible with a compatible blade and controlled feed | Heat, melting, chips, material-specific blade guidance |
| Small nonferrous metal or circuit-board stock | Only on machines and blades that specifically permit it | Material limits, clamping, chip control, speed and blade type |
| Full-size boards, trim, or sheet goods | Generally the wrong scale and capacity | Use a full-size saw or supported circular/track saw system |
| Curves and intricate profiles | Usually not the best tool | Scroll saw, coping saw, or another tool suited to curves |
A mini saw earns its bench space when it makes many small, consistent cuts that are awkward or risky on a full-size machine. If your projects require cutting only a few strips, a hand saw and shooting board may be enough. If you work with full-width lumber, a compact jobsite table saw is a different category. Our general table saw guide and portable table saw guide cover those larger machines.
Define the mini table saw category
Miniature bench saw versus compact jobsite saw
A miniature saw uses a small blade and small table to cut material measured in miniature or craft dimensions. Its capacity may be limited to thin stock, narrow strips, and short pieces. A jobsite table saw, by contrast, is meant to cut standard boards and panels and typically uses a much larger blade, table, fence, motor, and stand. Calling both “portable” or “compact” does not make them interchangeable.
Proxxon describes its KS 115 bench circular saw as a specialist for small pieces when a regular circular saw is impractical or too dangerous. The company lists material-specific cutting depths and compatible blades for wood, plastic, nonferrous metal, and other small work. This illustrates the miniature-tool design intent; it does not mean the same materials or limits apply to every mini saw. See the official Proxxon KS 115 page and follow the manual for the exact model.
Precision hobby saw versus generic multi-function craft device
Some small devices combine a tiny circular blade with sanding, drilling, polishing, or engraving accessories. Others are dedicated miniature table saws with a fence, miter guide, guard, and specific replacement blades. These designs should be evaluated separately. A multi-function product’s accessories do not establish that its saw function is accurate or suitable for a particular material. Read the operating instructions for the saw mode and identify the exact rated use.
A dedicated hobby saw usually provides clearer information about blade sizes, supported material, fence adjustment, table dimensions, and accessories. A multi-function device may be convenient for light craft work but can offer less certainty about long-term parts availability or blade compatibility. Compare documentation quality and service support, not the number of accessories in the box.
Mini does not mean safe for tiny pieces without a jig
Small stock can be harder to control, not easier. Fingers come closer to the blade; a strip may twist, lift, or get caught between the blade and fence. A low-power motor does not remove the hazards of a high-speed exposed blade. Choose a saw with suitable guarding and use maker-approved hold-downs, featherboards, push blocks, or jigs where available. If the manufacturer offers no safe way to guide a particular tiny piece, do not improvise a hand position near the blade.
Full-size table-saw techniques do not always translate directly to mini machines. A full-size push stick may be too large or may catch on the fence; tiny jigs can be unstable; and the small fence may not accept a standard accessory. Use only accessories compatible with the exact machine and follow its manual. OSHA’s general table-saw guidance highlights point-of-operation and kickback hazards, but a miniature product’s manufacturer manual determines its specific controls.
Match the saw to small-stock tasks
Model making and miniature woodworking
Mini table saws are often used to rip small strips, crosscut miniature boards, make repeated narrow stock, and prepare parts for scale models. A fence with readable fine adjustment can be more important than maximum power. A stable, square table helps produce parts that fit together. Check that the machine can repeat the intended width and that there is a safe method to hold the strip against the fence while keeping hands clear.
For model ships, dollhouses, architectural models, and small furniture, many parts are short and thin. A stop block or miter guide can support repeated crosscuts, but it must not trap the offcut against the blade. Use a purpose-made jig with the saw maker’s approval. Keep parts large enough to handle until after cutting where possible; pre-cutting a tiny piece can create a dangerous pinch point.
Craft materials and thin sheet stock
Thin plywood, balsa, veneer, craft hardwood, acrylic, plastic sheet, and printed circuit boards may be within the capability of some miniature saws—but compatibility is model- and blade-specific. Proxxon’s official KS 230 page lists different blade options for wood, plastic, nonferrous metals, and circuit-board materials. The same page provides different limits for different materials, reinforcing why a generic capacity claim is not enough. Check the current model page and manual for the exact saw and blade you plan to use.
Plastics can melt or fuse if the blade, speed, or feed is unsuitable. Thin sheets can flutter, lift, or crack. Composite boards may produce fine dust or sharp chips. Use a blade and feed method recommended by the manufacturer and support the sheet close to the cut. Do not cut materials that the manual excludes, even if an online review shows someone doing it.
Small nonferrous metal and circuit boards
Some hobby saws accept blades intended for aluminum, brass, copper, or printed circuit board material. That does not make every mini saw a metal saw. Verify the exact alloy or composite, thickness, blade type, speed, clamping, and chip-clearing instructions. Metal chips can be sharp and may become embedded in a work surface or skin. Electronic boards can contain dust or residues that require special handling. Consult the material supplier’s safety information and the saw maker’s instructions.
Never use a blade for nonferrous metal on steel or other ferrous metal unless both saw and blade manuals explicitly approve it. Do not assume a “multi-material” claim covers every substrate. If the manual gives a material limit, respect it. A small motor can overheat if overloaded, and forcing the stock can increase the risk of binding or kickback.
Repeat cuts versus one-off shaping
A mini saw is useful for repeated straight cuts when a fence and stop can be set accurately. It is less suited to curves, internal cutouts, bevels outside its adjustment range, or long boards that exceed table support. A scroll saw or coping saw is often better for curves; a small band saw may suit selected contour and resawing tasks; hand tools can be more controllable for one-off shaping. The intended cut should drive tool choice.
If you need a consistent strip width, test a batch on scrap and measure several pieces with a caliper or reliable rule. Adjust the fence and inspect for drift. Do not use the scale alone as proof of accuracy. The blade kerf removes material, and a fence that is not parallel may pinch stock or create uneven cuts. Precision comes from the whole setup, not just the machine’s label.
Blade, arbor, fence, and capacity
Blade diameter and cutting depth
Miniature saws use small blades, and their cut depth can be shallow. Compare the exact blade diameter, arbor hole, maximum RPM, and cutting depth shown in the manual. The maximum depth may differ by blade and material. A larger replacement blade is not an automatic upgrade: it may exceed the guard, motor, table opening, or speed design. Use only approved blade sizes and accessories.
Blade height adjustment may be limited, fixed, or achieved by a tilting table or arbor depending on the machine. Confirm how the adjustment works before purchase. Check whether the blade can be lowered for setup and raised only as much as the manual recommends for a cut. Do not force the adjustment or remove a guard to gain extra capacity.
Blade material, tooth count, and application
Mini saw blades may be high-speed steel, carbide-tipped, or specialty abrasive/diamond types depending on the material. A wood blade is not automatically suitable for plastic, metal, fiberglass board, or ceramic. Tooth count and grind affect how a blade cuts and clears material, but the maker’s intended-use statement is the primary guide. Check the exact blade diameter and arbor because hobby machines often use nonstandard sizes.
Proxxon lists different blades and applications for its KS 230, including a fine-tooth crosscut blade, carbide, diamond, and high-speed-steel options for specific materials. Those are examples for that model, not general compatibility with another mini saw. Use the saw manufacturer’s blade list or ask its support team if the material is not clearly covered. Keep blades sharp and replace damaged or loose-tooth blades.
Fence, miter guide, and table support
A miniature fence needs to lock securely and remain parallel to the blade. Verify its travel, locking method, scale readability, and whether it can be adjusted without shifting. A compact miter guide or angle stop can support small crosscuts, but check for play in the slot and whether the guide holds the workpiece far enough from the blade. Some accessories may be sold separately.
Look at the table surface and the space around the blade. A small table may offer little room to support an awkward part. If the manufacturer provides extension tables or hold-downs, verify compatibility and availability. A fence scale can be helpful for rough setup, but use test cuts and measuring tools to confirm a critical dimension. Do not assume that a product marketed for “precision” will arrive calibrated for every task.
Tilting arbor versus tilting table
Some mini saws tilt the blade or arbor; others tilt the table. The distinction changes how the workpiece sits during bevel cuts and what must be supported. A tilting table can angle the material toward the blade, while a tilting arbor may keep the work surface flat. These systems also affect fence and miter-guide use. Read the manual diagrams and determine whether the machine supports the bevel cuts you expect to make.
Do not assume a full-size table-saw bevel procedure applies to a small tilting-table design. Confirm the fence position, blade guard, and workpiece support for the exact setup. Make test cuts in scrap and measure the result. For miniature model work, a small bevel can affect fit significantly, so a reliable setup and clear angle scale may be more valuable than a large stated bevel range.
Motor, speed, and feed
Published power and speed numbers are not directly comparable across products unless their testing conditions and blade loads match. A high no-load RPM does not establish how the saw will perform in hardwood or metal. Check the maker’s recommended materials and feed method. If the blade slows, the tool vibrates, the workpiece burns, or the motor heats unusually, stop and reassess instead of increasing force.
Some miniature saws use belt drive or speed control; others do not. Those features can matter for material compatibility, but only within the manufacturer’s intended settings. Use the specified blade speed and avoid changing pulleys or controllers unless the maker approves it. A machine should be anchored or clamped as its manual requires, especially when feeding stock on a small, lightweight base.
Precision and repeatability for small parts
Fence calibration matters more at small scales
A small error can be a large percentage of a miniature part. Check that the fence is square or parallel as required, that its lock does not yaw, and that the blade is aligned to the miter slot or guide. If the machine uses a tilting table, repeat the alignment check after returning it to zero. Follow the manufacturer’s calibration process; do not adjust components in a way that compromises the guard or motor alignment.
Use a stable, flat bench. The saw should not rock or slide during operation. Proxxon’s KS 115 instructions, for example, describe fastening the saw to a sturdy board and clamping that board to a table. The exact mounting method varies by model, so use the manual for the saw you own. Before switching on, make sure the blade, fence, guard, and adjustment knobs are secured.
Measure test pieces, not just the scale
Make several test cuts from scrap that matches the project material. Measure width and squareness with appropriate tools and inspect the edge for tear-out, melting, or burn. If repeated pieces drift, investigate fence movement, feed technique, blade deflection, and stock variability. Record the setting that produced the right dimension. A labeled setup card can help reproduce it later.
For tiny strips, plan the sequence so the stock remains large enough to hold safely for as long as possible. Cut larger blanks first, then use a jig or stop for repeated sizing. Avoid holding a very short piece with fingertips beside the blade. If no safe hold-down or fixture is available, use a different process such as a hand saw, knife, or specialty miniature tool appropriate to the material.
Kerf and the saved side of the cut
The blade removes a kerf, so mark which side of the line is the finished part and include kerf width in repeated measurements. A fine blade with a narrow kerf may remove less material, but blade flex and tooth set can still affect the actual cut. Verify on scrap. When making multiple narrow strips, account for the fence reference and the blade’s position relative to the scale.
Small offcuts may be thrown, trapped, or pulled into the blade. Plan how each piece will be supported and removed after the blade stops. Never clear scraps by hand while the machine is running. Use the brush or clearing method specified by the maker with the saw unplugged when required.
Small-saw setup and safety
Read the manual and secure the machine
Read the complete manual before use. Confirm the work materials, blade types, maximum thickness, mounting method, guard setup, electrical requirements, and any prohibited operation. Miniature tools may have different safety hardware from full-size saws, and you must not assume a guard, splitter, or push device is included. If a part is missing or damaged, stop and obtain the correct replacement.
Mount or clamp the saw exactly as directed. A light machine can shift as stock is fed, especially if the table or support surface is slick. Keep the switch and plug accessible. Use the correct grounded outlet or approved power adapter, and keep liquids away from electrical components unless the manual allows otherwise. Disconnect power before adjusting, changing a blade, cleaning, or servicing.
Workholding and hand position
Keep hands outside the blade path and avoid reaching over the blade. Use the maker-approved push tool or jig for narrow and short stock. A generic full-size push stick may not fit a mini table, and a tiny improvised stick can slip. The workpiece should be guided against the fence or fixture as the manual describes, without twisting or pushing sideways into the blade. Do not cut freehand unless the product’s manual explicitly describes that operation.
Small pieces can be difficult to control because the operator’s fingers are close to the cutting area. Do not hold a piece so small that it cannot be guided securely. Consider making a larger blank, attaching it temporarily to a carrier board if permitted, or switching to a hand tool. Do not sacrifice a guard or safe hand position for a tiny part. OSHA’s table-saw hazard guidance explains how hands near the point of operation and kickback can cause serious injuries; while written for workplace equipment, the hazards are relevant to any exposed rotating saw blade. See OSHA’s table-saw safety overview.
Control kickback, chips, and material hazards
Kickback can occur if material binds, twists, or is caught by the blade. Keep stock straight and supported, use the fence and guard as intended, and do not force the feed. Stand out of the likely path of ejected material. Wear eye protection and other protective equipment specified by the manual. Small chips can still injure eyes, and thin stock can break or become a projectile.
Material-specific hazards matter. Cutting fiberglass-reinforced board, printed circuit boards, plastics, and metals may create dust, chips, or fumes that require particular controls. Check material safety information and the tool manual. Do not cut unknown or coated materials in a closed room without understanding the dust or fume risks. Keep combustible materials away from hot chips and the motor, and maintain a clean work area.
Keep the guard and accessories in place
Use the blade guard, splitter, and other safety parts included with the saw. Do not remove them because a small workpiece is difficult to feed; choose a safe jig or another tool instead. If the guard obstructs a cut, consult the manual or manufacturer before changing the setup. Never use a damaged or incomplete saw.
Inspect the blade and flange before use. Confirm the blade is mounted in the right direction and is within the speed limit. Tighten fasteners as directed. Do not use blades with cracks, missing teeth, warping, or the wrong arbor. Keep spare blades in their cases and store them away from children.
Dust, noise, and workspace
Dust collection at miniature scale
Small saws can produce fine dust even if the stock is tiny. A built-in dust port may connect to a vacuum adapter, but port size alone does not guarantee effective collection. Use the collector and hose specified by the manufacturer when possible. Keep the hose from pulling the light saw or interfering with the fence. Empty the collection container and clean the saw as directed.
Proxxon’s KS 115 information describes a side door for sawdust removal and a vacuum adapter; Proxxon KS 230 product information also describes dust removal. These are product-specific features, not a guarantee of complete dust capture. Wear appropriate eye and respiratory protection based on the material and workspace, and clean with a suitable vacuum rather than blowing dust around. Avoid cutting materials that create hazardous dust without a suitable control plan.
Noise and vibration
A mini saw may be quieter than a full-size machine, but sound varies by motor, blade, material, support, and room. A small machine that is not secured can vibrate or walk across the bench. Follow the mounting instructions and place the saw on a solid surface. If abnormal vibration or noise starts, stop immediately and inspect the blade, mounting, and workpiece after disconnecting power.
Noise claims on product pages are not directly comparable unless the measurement conditions are stated. Consider hearing protection if required by the tool instructions or your exposure. A shared home space also needs planning for dust migration, chips, lighting, and access to the power switch.
Lighting, magnification, and bench organization
Miniature work benefits from bright, shadow-free lighting. Position task lighting so the blade and cut line remain visible without glare. Magnification can help with layout and inspection, but it should not put your face close to the blade or obstruct your posture. Keep rulers, calipers, jigs, and stock organized so that reaching for a tool does not cross the running saw.
Store blades, hex keys, fences, and miter guides in labeled compartments. Keep the bench free from loose scraps and dust that can interfere with the fence or workpiece. A clear layout helps repeat a setup and reduces the chance of using the wrong blade for a material.
Buying and ownership checklist
Check the exact machine and manufacturer documentation
Record the make, model number, blade diameter and arbor, motor and speed information, cut-depth limits, approved materials, fence type, table dimensions, guard design, mounting method, and dust port. Download the manual before purchase if available. Check whether it identifies the intended user and tasks. A manufacturer that provides clear manuals and replacement parts can be a better long-term choice than an anonymous listing with dramatic claims and little support.
Micro-Mark’s official MicroLux miniature table saw page describes the intended small-stock tasks for one model, and its product instructions page lists manuals for miniature saws and accessories. Proxxon’s KS 115 page and KS 230 page provide maker-specific materials, accessories, and product limits. Use these as examples of the documentation to seek, not endorsements or universal specifications.
Evaluate fence, accessories, and consumables
Check that the fence locks, the miter guide has manageable play, and blades are available in the correct diameter and arbor. Determine whether the saw includes a guard, fence, miter guide, mounting hardware, dust adapter, and blade. Accessories may be specific to a model and sold separately. Verify that a replacement blade is approved for your intended material and speed.
Look for replacement parts, warranty service, and clear instructions. Availability can change, so check current maker or retailer pages. Avoid assuming that an accessory from a full-size table saw can be adapted. A featherboard, stop, or push block must match the mini saw’s geometry and not interfere with the guard.
Consider the full working setup
Measure the bench area and the material you will process. Include space for the operator, stock infeed and outfeed, dust hose, task light, and storage. A mini saw may have a tiny footprint, but long strips still need support. Clamp or bolt the saw to a stable board if the manual requires it. Think about where dust will go and how you will clean the machine between material types.
Use buyer reviews cautiously
Reviews can identify practical issues such as fence slop, unavailable blades, poor instructions, or a machine that is difficult to mount. They do not establish that a saw can safely cut a material outside its published rating. Look for comments that identify the exact model and material, and compare them with manufacturer documentation. Avoid relying on unverified claims about precision, motor life, or cut depth.
This article uses primary product pages and manuals to explain the category and its limits. It does not report hands-on testing, current prices, or independent measurements. Amazon product cards should be added only after the exact model and identifier are verified through the authorized product API; generic products should not be represented as specific branded saws.
When another tool is better
Use a full-size portable or stationary saw for ordinary lumber
If you need to cut dimensional lumber, larger hardwood boards, or plywood panels, a mini saw is the wrong capacity. Use an appropriately sized full table saw, circular saw, or track saw with support and safety equipment suited to the stock. See our portable table saw guide for jobsite-scale machines and beginner table saw guide for full-size saw selection.
Use a scroll saw for curves
A mini table saw makes straight cuts, not tight curves. A scroll saw can follow intricate profiles in suitable thin stock, while a coping saw or craft knife may be adequate for occasional details. Compare blade clearance, material support, and the amount of finish sanding expected. Our scroll saw guide covers tools designed for curved and intricate cuts.
Use a band saw for selected contour or resaw work
A small band saw may handle some curved cuts or narrow resawing, depending on its capacity and blade. It is not interchangeable with a miniature table saw for narrow, repeatable strips. Choose by cut type and material. Our band saw guide covers that separate machine category.
How to compare mini table saws
Compare products using the same checklist: intended stock scale; blade diameter, arbor, and speed; material-specific depth limits; fence and miter-guide design; guard and mounting method; dust access; accessory and blade availability; manual quality; warranty; and service support. Reject any listing whose instructions do not clearly match the intended work. A shallow miniature saw can be excellent for model parts yet inappropriate for a small home renovation; category fit matters more than raw wattage or a broad “table saw” label.
Primary references for this guide include Proxxon’s official KS 115 product page, KS 230 product page, and KS 115 manual; Micro-Mark’s official miniature table saw product page and manual index; and OSHA’s table saw hazard guidance. Manufacturer material describes each product and should not be generalized to other machines. OSHA’s material addresses workplace safety and is not a substitute for a specific hobby saw manual.
Frequently asked questions
What is a mini table saw used for?
It is generally used for small, straight cuts in miniature and craft stock, such as model parts, thin wood strips, and selected plastics or nonferrous materials when the maker approves them. It is not intended to replace a jobsite or cabinet table saw.
Can a mini table saw cut regular 2-by-4 lumber?
Generally no. A miniature saw’s blade, table, fence, motor, and cut depth are designed for small stock. Use a full-size saw with appropriate capacity and support. Never exceed the mini saw’s rated material limits.
Are mini table saws safer than full-size saws?
Not automatically. Small workpieces can put fingers close to the blade and may be harder to control. A small blade can still cause severe injury. Follow the model-specific guard and workholding instructions and use an approved jig or push device.
What materials can a mini saw cut?
It depends on the exact model and blade. Some manufacturers list wood, plastics, nonferrous metals, or circuit-board materials with separate limits. Check both saw and blade instructions before cutting anything beyond the stated use.
Do all mini table saws use the same blades?
No. Blade diameter, arbor, thickness, speed rating, and mounting can differ. Use the exact approved blade or a compatible replacement confirmed by the manufacturer. Do not assume that a standard hardware-store blade will fit.
Can I cut metal on a hobby table saw?
Only if the saw and blade manuals explicitly allow the specific nonferrous metal and setup. Many mini saws do not permit ferrous metals such as steel. Verify material thickness, blade, clamping, speed, and chip-control instructions.
Should I buy a mini saw or a small jobsite table saw?
Buy a mini saw for model and craft stock. Choose a jobsite saw if you need to cut ordinary boards or panels. They serve different purposes and should not be compared solely by footprint.
How can I make repeatable narrow strips?
Use a stable fence, verify alignment, support the stock, and test the setting on scrap. Use an approved push device or jig and keep hands away from the blade. Do not attempt a strip narrower than the machine’s safe workholding method allows.
Do mini table saws need dust collection?
Dust control is useful even for small cuts. Use the saw maker’s compatible adapter and a suitable vacuum where available, and clean the machine as directed. Material-specific dust may require additional ventilation or protective equipment.
Conclusion
The best mini table saw is a well-documented, stable machine that fits your miniature or craft stock, supports the cuts you repeat, and has compatible blades and accessories. Check the true material limits, fence precision, guard and mounting instructions, dust access, and replacement-part supply. Do not confuse a hobby saw with a compact jobsite saw, and do not use small size as a reason to work without guarding or a safe holding method.
For model making and thin stock, a dedicated mini saw can provide a useful repeat-cut station. For ordinary lumber, full-size table saws or guided circular saws are the right scale. Choose according to the material and cut, then follow the exact maker’s manual from setup through cleanup.
This article is general buying information. Follow the saw and blade manuals, material safety information, and appropriate training.