Best Coping Saws: A Practical Guide to Curves, Trim, and Fine Cuts
The best coping saws help make controlled curves and detailed cuts in wood, plastic, and other suitable materials. Their thin replaceable blades sit in a U-shaped frame and are tensioned between the frame ends. The narrow blade can turn more readily than a typical handsaw, which makes a coping saw useful for shaping trim joints, cutting small interior openings, following patterns, and removing material from a tight corner.
A coping saw is a simple hand tool, but its results depend on choosing a compatible blade, setting tension correctly, supporting the stock, and steering gradually. A blade can wander or break if it is forced around a turn, pulled sideways, or tensioned incorrectly. A frame that feels comfortable and stays aligned can make a long session easier, but technique matters more than a feature list. Before buying, consider what you will cut, the tightest curve you expect, and whether replacement blades are easy to find.
This guide explains frame depth, blade attachment, tooth selection, tensioning, cut techniques, maintenance, and the tasks a coping saw handles well. It does not rank products using lab tests or invent model specifications. Confirm the frame’s capacity, blade length and end style, and manufacturer instructions before purchasing. Product availability and blade compatibility can vary by market and listing.
Affiliate disclosure: DailyHomeDecorating.com may earn a commission from qualifying purchases through links in this article. This does not change the price you pay.
Amazon product examples to compare

ASIN: B000B3AR04
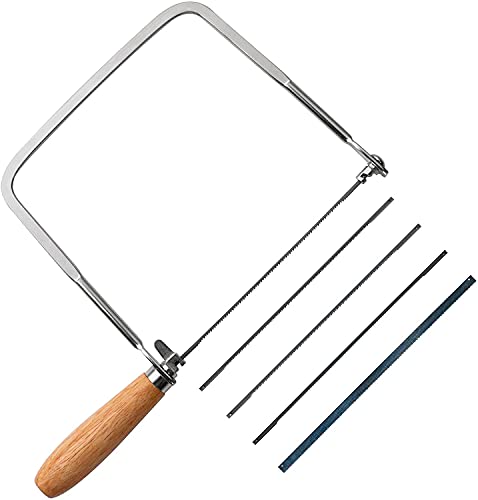
ASIN: B000ALF4FA
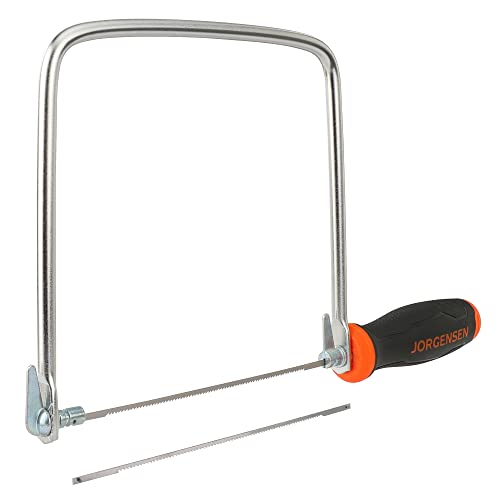
ASIN: B09XHTNKLD

ASIN: B0051XQDD4
Certain content that appears on this site comes from Amazon. This content is provided “as is” and is subject to change or removal at any time. Product examples and images are supplied through Amazon Creators API; confirm specifications and availability on the current listing.
What a coping saw is designed to do
A coping saw has a narrow blade stretched across a deep U-shaped frame, with a handle at one end. The blade cuts as the user moves the frame through the work. Unlike a power saw, it advances by hand and offers close feedback through the handle. The operator can pause, reposition, and make small changes as the blade follows a curved line. The frame lets the blade reach into areas that a straight-backed handsaw cannot access without removing an edge of the workpiece.
The tool’s name comes from coping a molding joint: one piece of trim is cut along its profile so it can fit against the face of another piece. A coping saw can remove the waste behind the cut profile and follow the contour of a molding. It also works for small decorative shapes, craft patterns, and interior cutouts that can be reached by threading the blade through an access hole. Its narrow blade makes tight turns possible, though very delicate curves may require a different blade or a slower approach.
A coping saw is not intended for fast straight cuts through large stock. For broader curves in thicker wood, a bow saw or bandsaw may be more efficient. For fine interior patterns, a powered scroll saw may be suitable. For long straight cuts in lumber or panels, a circular saw guide describes a different tool. A scroll saw guide explains a stationary machine for detailed curves. Choose by stock size, cut shape, access, and desired pace.
Manual cutting has a few advantages. The tool does not need electricity, takes little storage space, and is easy to carry to a workbench or repair. It can also make a useful choice when a powered tool would be too aggressive for a small piece. Those advantages do not mean it is risk-free: the thin blade is sharp, the frame can flex, and small workpieces can slip. Secure support and safe hand placement remain important.
Start with your actual projects
Before choosing a model, think of the first few tasks you want to complete. List the material, thickness, curve tightness, cut length, and whether you need to start from an edge or make an enclosed cut. A coping saw for occasional molding touch-ups has different demands from one used daily for fretwork or crafts. Consider how often you will replace blades and whether you can comfortably tension a small blade.
- Molding and trim: Frame clearance, a blade that can follow the profile, and a handle that stays comfortable through repeated strokes are useful.
- Small craft patterns: Fine blade options, secure clamps, and a frame that allows controlled turning matter.
- Interior openings: Check how easily the blade can be removed and reattached after threading through a starter hole.
- Occasional household work: Readily available replacement blades and simple adjustments may matter more than premium accessories.
- Workshop use: A durable frame, reliable blade alignment, and comfortable tensioning can reduce interruptions.
Also estimate the largest workpiece you may place inside the frame. The frame’s throat depth determines how far the blade can reach from the outside edge toward the frame spine. A shallow throat may be fine for a small molding or ornament; larger panels or interior cutouts may need more reach. A deeper frame can increase access but may be bulkier, and it does not make the blade suitable for thick stock beyond its rating.
Frame depth, stiffness, and alignment
The U-shaped frame holds the blade under tension. Frame depth is usually described as the distance from the blade to the back of the frame. It indicates how far a workpiece can extend into the frame before it contacts the spine. Measure the projects you expect to cut and compare them with the stated throat. The maximum reach is not always the practical reach: your hands must still be able to turn the stock, and the frame must clear clamps, a bench, or other obstacles.
Frame rigidity matters because the blade needs stable support at both ends. A frame that flexes excessively may make it harder to keep the blade straight and can lose tension as pressure changes. Material alone does not tell the whole story; frame shape, joints, and construction also matter. Hold the saw if possible, check that the frame ends stay aligned when tension is applied, and look for smooth adjustment hardware without sharp edges or visible damage.
The blade should sit in the clamps so it is straight and centered, not twisted. Some coping saws allow the blade to rotate in the frame to cut at an angle or reach a particular direction. This can be helpful when a frame would otherwise hit the work, but it changes how the handle and cut line relate. Follow the maker’s adjustment instructions, lock the blade securely, and test the orientation on scrap before working on a finished piece.
Frame size and workpiece clearance
A larger throat increases reach, but the frame may become less compact and can be harder to maneuver around a bench or inside a cabinet. A small saw can be nimble for short cuts while limiting the size of a panel that fits within the frame. The right balance depends on whether you work mostly on small craft pieces or trim installed near walls. A large frame may also require more room around the workpiece as you turn it.
Consider handle position and orientation. The handle should allow a relaxed grip and a natural stroke without your knuckles striking the frame or stock. Some designs permit changes to blade orientation; others use a fixed position. If you are left-handed, have limited hand strength, or need to work from an unusual angle, try the tool before buying. A feature that sounds flexible may be difficult to adjust safely without practice.
Blade length, width, tooth count, and compatibility
The blade is the working part of a coping saw, and replacement blades are consumables. Before purchasing a frame, confirm the blade length and end style it accepts, then check that replacements in useful sizes are available. Some blades use plain ends held by clamps; pin-end arrangements or proprietary fittings may not be interchangeable. Do not assume that any blade labeled for a coping saw will fit every frame. Compare dimensions and consult the manufacturer’s instructions.
Blade width and thickness affect how tightly a blade can turn and how resistant it is to bending. A narrow blade can follow smaller curves, while a wider or thicker blade may be more stable on broader curves. Fine blades can help with delicate work, but they may cut slowly through thicker stock and can break if twisted or pushed hard. Blade selection is a balance among curve radius, stock thickness, material, and the finish you need.
Tooth count and tooth geometry influence how quickly the blade removes material and how smooth the cut edge looks. Coarser teeth may clear chips more quickly in suitable stock, while finer teeth can support slower, more controlled detail work. The best choice varies with the blade design and material. Look for guidance from the blade maker rather than relying only on a tooth-count rule. If the teeth are dull, packed with material, or damaged, replace the blade; a fresh blade should cut without excessive force.
| Blade consideration | Why it matters | Buying check |
|---|---|---|
| Length and end style | Determines whether the blade fits and can be tensioned | Match frame specifications exactly. |
| Width and thickness | Affects turn radius and resistance to deflection | Choose for the tightest curve and stock thickness. |
| Tooth size and spacing | Influences chip clearance, pace, and edge finish | Check the blade maker’s material guidance. |
| Material | Suitability for wood, plastic, or other approved stock | Use only blades rated for the material and frame. |
For trim and molding, the blade should follow the profile without tearing out fragile edges. For a craft pattern, a fine blade can make a tighter turn, but the shape may still require relief cuts to remove waste. For thicker stock, a blade with appropriate chip clearance can help avoid clogging. Try several compatible blades on offcuts from the same material to learn how each behaves.
Never use a blade that is bent, cracked, rusted, missing teeth, or otherwise damaged. A damaged blade can snap under tension. Keep spare blades in their packaging or a labeled container to avoid tangling and accidental cuts. Dispose of broken pieces carefully; short fragments are sharp and can be difficult to see on a crowded bench.
Set and maintain blade tension
Tension is what keeps the blade taut between the frame ends. Too little tension can make the blade wander and produce a wavy cut. Excessive tension can overstress the blade or frame and lead to sudden breakage. Follow the saw maker’s method for tensioning, which may use a lever, a screw, or a frame flexing action. Do not copy a generic sound test if it conflicts with the specific instructions for your tool.
Install the blade with its teeth facing in the intended direction. On many coping saws, teeth point toward the handle so the blade cuts on the pull stroke, but designs and user preferences can vary. Check the arrow, diagram, or manual rather than assuming. If the blade can be rotated in its clamps, make sure it is aligned with the intended cut and locked firmly before use.
To tension a blade, release the frame or adjustment mechanism as instructed, seat both blade ends fully, and apply tension gradually. Keep fingers away from the teeth and avoid over-bending the frame. Before cutting, gently check that the blade is straight and secure without touching the sharp edge. If it loosens during work or begins to deflect, stop and reset it rather than trying to finish the cut with a compromised setup.
When changing a blade, support the frame so it does not snap closed or spring unexpectedly. Release tension in a controlled way and keep the blade pointed away from your body. If the blade is stuck in an interior opening, do not twist the frame forcefully against the stock. Stop, release tension safely, and reassess the access hole and blade orientation.
How often should a blade be changed?
There is no universal replacement interval. Change it when cutting becomes difficult despite correct setup, the edge quality deteriorates, teeth are damaged, or the blade no longer holds tension reliably. A dull blade encourages excess force and makes it harder to follow a line. Keep several sizes available if your projects involve both broad curves and detailed turns, and record which blade works well with common materials.
Cut curves without forcing the blade
Mark the pattern clearly and secure the workpiece with a clamp or vise appropriate to its size. The work should be supported close enough to the cut that it does not vibrate, but clamps must not block the frame or prevent turning. Keep the cut line visible and place the waste on the side that lets the blade travel freely. Begin with a practice piece if the pattern is intricate or the material is valuable.
Start the cut with the blade aligned just inside the waste side of the line. Use short, controlled strokes and let the teeth remove material. Turn the workpiece gradually rather than bending the blade sideways. The frame follows the blade’s orientation, so your hands must coordinate the stroke with the turning motion. If the curve tightens, slow down and make a series of small direction changes.
For a tight inside corner, a relief cut from the waste area can give the blade room to turn. Plan relief cuts so they meet the main path without crossing the finished outline. On a pattern with several narrow sections, remove some waste before cutting delicate bridges. This reduces the amount of material pushing against the blade and lowers the chance that the finished piece will break while being turned.
For interior shapes, drill an access hole inside the waste, release one end of the blade, thread it through the opening, and reinstall it with proper alignment and tension. Make the starter hole large enough for the blade to pass without damaging the finished line. Disconnect or immobilize the saw before threading. Complete the inside cut and repeat the process for each opening. Do not leave a blade loose while repositioning the stock.
Common coping-saw uses
Coping an inside trim joint
A coping saw is traditionally used to shape the end of one molding piece so it follows the profile of an intersecting piece. The process begins with a mitered or marked profile that reveals the contour. The saw removes waste behind that line, leaving an edge that can be adjusted with a file or sandpaper. The goal is a close fit, not a rushed cut. Practice on offcuts from the same molding because profile depth, grain, and paint or finish can affect the final fit.
Support the molding so it cannot roll or slide. Mark which face is visible and which side is waste. Use short strokes near tight corners and check the profile frequently. If the cut drifts into the retained edge, pause and evaluate whether the part can be corrected or should be recut. Do not try to hide a large gap with excess caulk if the joint needs a precise appearance.
Curves and decorative patterns
For a curve, guide the work into the blade while turning the stock. The tighter the radius, the smaller the blade and slower the feed may need to be, subject to the blade maker’s recommendations. Avoid sharp, abrupt turns. A sequence of relief cuts through the waste can help remove material without twisting the blade beyond its natural curve.
Large patterns may exceed the frame throat even if each local curve is small. Plan how the piece will rotate and whether the frame can reach every section. If the design cannot turn inside the frame, consider a different tool such as a scroll saw or jigsaw, or divide the pattern into parts. The frame should not be forced against the workpiece as a substitute for adequate throat depth.
Small openings and fretwork
Interior cutouts require an access hole. Plan the hole location within the waste and drill carefully so it does not break into the final line. Remove blade tension before threading, secure the blade again, and verify tooth direction. Small openings may need several blade changes because the saw’s frame cannot always be turned through adjacent openings from one setup.
For repeated fretwork, organization is valuable. Mark each hole and cut path, keep a tally of completed openings, and inspect the blade after a breakage. Delicate webs between cutouts can be weaker than they appear. Cut in a sequence that leaves strong material for support as long as possible, and avoid gripping finished sections so tightly that they snap.
Plastic and other materials
Some coping saw blades are intended for materials beyond wood, but compatibility depends on the blade, frame, thickness, heat behavior, and manufacturer guidance. Plastic can melt or bind if the blade speed and feed are unsuitable. Metal requires a blade specifically made for that stock and often a different cutting approach. Do not assume a woodworking blade can safely cut tile, metal, acrylic, or composite material simply because it fits the frame.
Identify the material before cutting. Review its safety information and the blade label, and make a test cut in scrap if allowed. Use eye protection and control dust or chips. Some materials may require a powered tool, special coolant, extraction, or a completely different method. If the maker does not specify the material as suitable, select a tool designed for it.
Safe setup and handling
Use eye protection and keep the bench well lit. Secure the workpiece so it cannot tip, rotate unexpectedly, or slide toward the blade. A vise or clamp should hold the material without crushing it and without interfering with the saw frame. Keep fingers outside the blade path and never position a fingertip directly in front of the teeth to steer a tight turn.
- Inspect frame, handle, blade, and clamps before starting.
- Install only blades that match the frame and material, with correct tooth direction and tension.
- Keep the saw frame clear of the bench edge and other objects through the full stroke.
- Use short strokes and moderate pressure; do not force the blade.
- Stop if the blade binds, loosens, or begins to bend away from the line.
- Release tension before changing or threading a blade, keeping the sharp edge away from your body.
- Keep broken fragments and sharp spare blades secured and out of reach of children.
A coping saw has no motor switch, but the blade can still cut skin quickly. Do not rest a hand in line with the blade in case it breaks. Avoid gloves that snag or reduce grip while operating; if gloves are used for material handling, remove them before cutting when they could interfere. Keep sleeves and drawstrings away from the frame and blade.
When cutting small pieces, make sure the work cannot be pulled from your grip or trapped in the frame. Use an appropriate holding fixture or enlarge the blank temporarily if that makes control safer. If the project is too small to secure and keep hands clear, choose a different method. Never brace the work against your body or hold it in your lap while cutting.
Broken blades can spring or leave a sharp end. If one breaks, stop, set the frame down, and remove tension safely before retrieving the pieces. Inspect the material and frame for fragments. Do not continue with a new blade until you understand why the first one failed. Sudden failure can result from excess tension, a damaged blade, incorrect installation, tight turns, or side pressure.
Maintenance and storage
After use, release blade tension as directed if the saw will be stored for an extended period. This can reduce prolonged stress on the blade and frame. Wipe the frame and handle clean, remove dust, and check that adjustment screws move smoothly. Do not oil parts unless the manufacturer recommends it; lubricant can collect debris or affect the grip and clamp surfaces.
Inspect blades for rust, bent sections, chipped or missing teeth, and signs that the ends are wearing where they contact the clamps. Replace damaged blades rather than trying to straighten them. Check that clamps hold securely and that the frame ends remain aligned under tension. If the handle is loose, cracked, or spinning unexpectedly, stop using the saw and repair or replace the tool.
Store blades sorted by size and type in packaging or a dedicated case. Keep them dry to reduce corrosion and separate them from loose hardware that can damage teeth. Store the saw so the frame cannot be bent under other tools. Keep the tool and spare blades away from children and anyone unfamiliar with sharp tools.
When a cut wanders, first check blade condition, tension, tooth direction, and compatibility with the stock. Then reduce feed pressure and use a broader curve on scrap. If the frame twists as you turn the work, check whether the blade is clamped straight and whether the frame reaches the cut without collision. A consistent problem after correct setup can indicate a worn clamp or damaged frame.
How to compare coping saws
Compare frame throat, maximum recommended stock thickness, blade length and end type, and the availability of replacement blades. Look for clamps that hold securely and are easy to adjust without sharp burrs. Check whether the blade can rotate in the frame and whether the handle permits the grip and orientation you prefer. A comfortable handle should feel secure without requiring a clenched grip.
Read product details carefully. Some listings bundle blades in assorted sizes; others include only one blade. Confirm that replacements are sold separately in the sizes you expect to use. If you plan interior cuts, verify the blade can be released and threaded through a starter hole and then re-tensioned. If the manual is not easy to find, that can make compatibility and maintenance harder to confirm.
Do not assume a more elaborate adjustment system will improve every cut. A simple frame with reliable clamps can be more useful than a complicated mechanism that is difficult to understand. Compare warranty, replacement parts, handle construction, and return terms. If possible, hold the saw in the orientation you will use and test whether the frame clears the workpiece and bench.
How a coping saw differs from other hand and powered saws
A coping saw uses a thin blade held in a frame and is aimed at curves and small details. A fret saw has a similar purpose but commonly uses a deeper frame and finer blade arrangement, depending on its design. A bow saw has a larger frame and blade for broader work. A hand saw guide for outdoor pruning describes another category of tool; see the site’s hand saws for gardening guide for pruning-specific examples.
A scroll saw holds its blade vertically in a powered machine, and the work moves across a table. It can be useful for repeated intricate cuts and interior shapes, while a coping saw is portable and manually powered. A jigsaw is a handheld powered tool that can cut curves in larger panels but requires a different grip and support method. For larger branches, a pole saw guide addresses reach and pruning. The right tool depends on stock, shape, access, speed, and operator control.
For projects that combine woodworking and finishing, the saw only prepares the shape. Cabinet or trim finishing may involve sanding, filling, and paint; the site’s cabinet paint-sprayer guide covers a separate step. Plan each operation with its own tool and safety requirements rather than expecting a coping saw to handle all stages.
Frequently asked questions
What is a coping saw best for?
It is useful for following curves, coping molding profiles, cutting small decorative shapes, and making some interior openings in material that fits within its frame. It is not designed for fast straight cuts through large boards.
How deep should the frame be?
Choose a throat that reaches across the largest workpiece you plan to turn, with room for your hands and the frame to move. Measure actual project blanks rather than relying on pattern dimensions alone. A deeper throat can add bulk and will not increase the blade’s rated stock thickness.
Which way should the teeth face?
Many coping saws are set to cut on the pull stroke, but frame and user preferences vary. Check the tool’s markings or manual and install the blade as intended. Test the stroke on scrap and keep hands clear of the blade path.
How tight should the blade be?
Use the manufacturer’s tensioning method. Too little tension can cause wandering; too much can break the blade or stress the frame. Do not rely on an informal sound test if it conflicts with the instructions for your saw.
Can a coping saw cut an interior shape?
Yes, when the frame and blade can be released and reattached. Drill an access hole in the waste, release one end of the blade, pass it through the opening, reinstall and tension it, then cut the shape. Disconnect or stabilize the saw before threading and confirm the blade is secure before working.
Why does my coping saw blade keep breaking?
Possible causes include excessive tension, a damaged or incompatible blade, incorrect installation, tight turns, or pushing sideways. Stop after a break, inspect the tool, and make a controlled test cut with a suitable blade. Repeated breakage should prompt a review of frame condition and technique.
Can it cut plastic or metal?
Only with a blade intended for that material and a frame rated for the application. Heat, chip clearance, stock thickness, and dust matter. Check the blade and material instructions, and choose a dedicated tool if suitability is unclear.
What is the difference between a coping saw and a fret saw?
Both are manual frame saws for curved detail work, but frame depth, blade dimensions, and intended precision can differ by design. Names are not always applied consistently across listings. Compare the actual throat, blade compatibility, and manufacturer description for the tool you are considering.
How do I make a tighter curve?
Use a blade suitable for the radius and stock, slow down, make small turns, and remove waste with relief cuts where appropriate. Do not twist the blade sideways to force it around a corner. Test on scrap before cutting a finished part.
Is a coping saw suitable for children?
It is a sharp hand tool, not a toy. Any use by a young person requires age-appropriate judgment, direct supervision, and instruction in safe hand placement. If the user cannot keep fingers clear and control the stock, choose a safer non-powered craft method.
Conclusion: choose a frame and blade for the cut
The best coping saws make it easier to follow a curve or shape a trim profile when the frame reaches the work and the blade is suited to the material. Compare throat depth, frame stiffness, blade length and end style, clamp security, handle comfort, and the availability of replacements. For repeated interior cuts, convenient blade threading can save effort; for occasional trim, a simple reliable frame may be all you need.
Start with a secure workpiece and a sharp compatible blade. Set tension according to the maker, use short strokes, and turn gradually rather than forcing the blade. Practice on scrap, stop if a blade loosens or breaks, and use another saw when the work exceeds the frame or calls for a different cut. With careful setup, this compact hand tool can handle detailed curves without electricity or a large shop footprint.